Your handwriting looks like a doctor's prescription. You avoid signing birthday cards in public. In meetings you reach for your phone to type notes because you're embarrassed someone might glance over your shoulder. You've told yourself it's “just the way you write,” and maybe you've believed that for 20 years.
Here's what actually happened: somewhere between third grade and adulthood, you stopped practicing and started typing. Your pen grip developed bad habits nobody corrected. Your writing muscles weakened from disuse. And every time you picked up a pen, you rushed, because slow deliberate writing felt childish.
Sound familiar? The good news? Handwriting is a skill, not a talent. And skills can be learned at any age. Here's exactly how.

Why Adults Struggle With Handwriting (And Why It's Not Your Fault)
There's a specific reason your handwriting looks the way it does, and it has nothing to do with intelligence or natural ability. Most schools spend a few weeks on letter formation in early grades, then move on. No grip instruction, no posture coaching, no deliberate practice framework. You were just expected to figure it out.
Add 20-plus years of keyboard typing on top of that, and the fine motor habits you developed have mostly atrophied. Your hand reaches for a pen and your fingers do all the work: tiny, cramped movements that produce inconsistent, shaky letters.
The number one cause of messy handwriting in adults is using finger muscles instead of arm muscles. Fingers are precision instruments, not endurance tools. Your arm and shoulder produce the fluid, consistent strokes that make handwriting look clean and controlled. None of this was ever properly taught to you, so none of it is your fault.
The Foundation: Posture, Grip, and Paper Position
Before you practice a single letter, get the mechanics right. These fundamentals determine the quality of everything that follows.
Sit upright with your feet flat on the floor. Slouching compresses your writing arm and forces your fingers to overcompensate. Sit at a desk. Not on a couch, not in bed.
Tilt your paper 45 degrees clockwise if you're right-handed, 45 degrees counterclockwise if you're left-handed. This angle aligns your forearm with your direction of writing and removes wrist strain that causes letters to lean inconsistently.
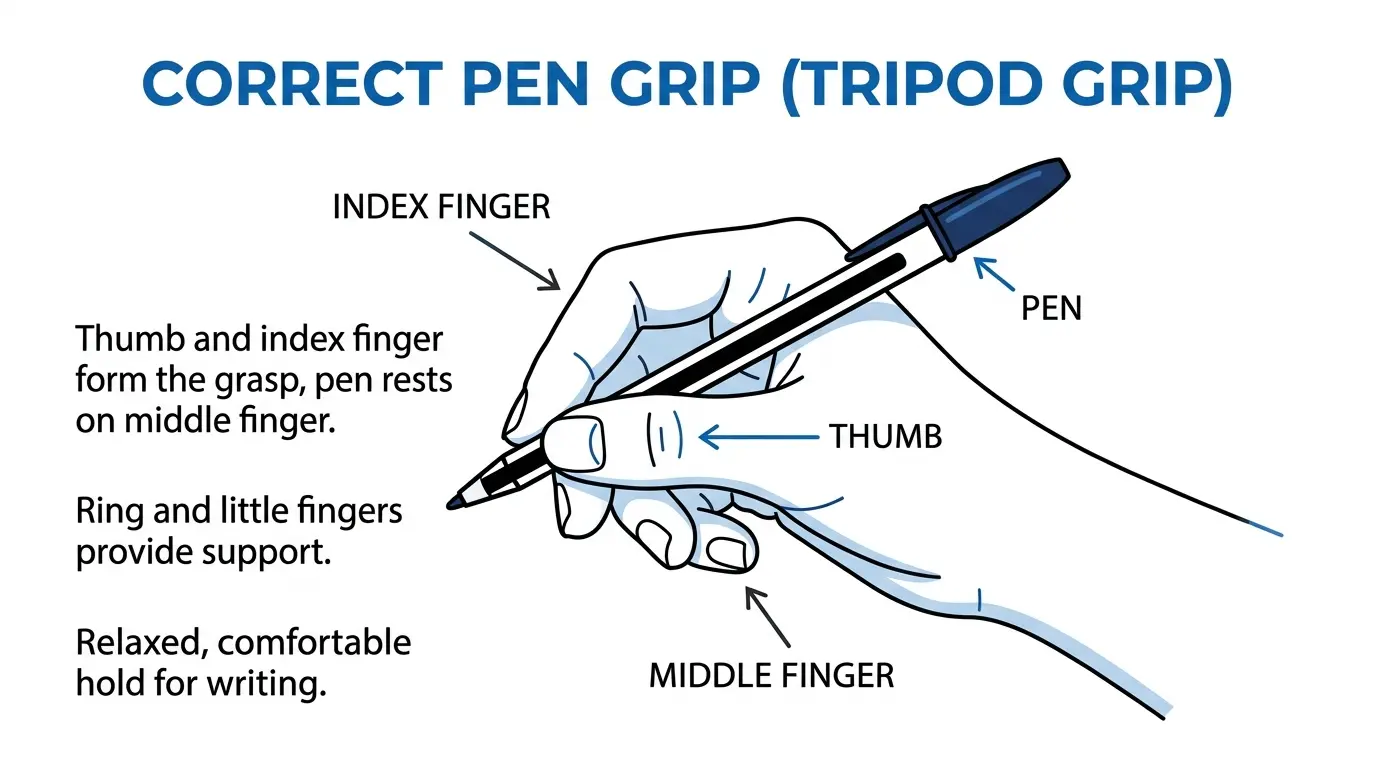
Use the tripod grip: your pen sits between your thumb and index finger, supported by the middle finger, with the ring finger acting as a guide rail along the paper. Hold the pen 2 to 3cm from the tip. Too close and you lose visibility; too far and control disappears.
Most importantly, the movement should come from your elbow and shoulder, not your fingers. Rest your forearm lightly on the desk. That contact point is your anchor for clean, consistent strokes.
Practice Drill
Before your next writing session, spend 60 seconds deliberately resetting your posture, grip, and paper angle, one at a time. That single minute eliminates the most common causes of inconsistency before you've written a word.
Technique 1: Slow Down Deliberately
Speed is the enemy of improvement. Every adult writer does this: they write fast because slow writing feels unnatural, almost embarrassing, like performing a task too carefully. Resist that instinct completely.
Deliberate practice at 50% of your normal writing speed produces results three times faster than writing quickly. The neuroscience is straightforward: slow, focused repetition creates stronger neural pathways than rushed, automatic movement. Your brain needs to consciously encode the correct motor pattern before that pattern can become automatic.
Think of it like learning a piano piece. You play slowly and correctly many times. Then speed arrives naturally. Trying to play fast before you can play correctly only embeds the wrong habits deeper into muscle memory.
Practice Drill
Write this sentence ten times at half your normal speed, with full attention on each letterform: “The quick brown fox jumps over the lazy dog.” Every stroke intentional. Done consistently, this drill alone produces noticeable improvement within two weeks.
Technique 2: Use Arm Movement, Not Finger Movement
This is the single most overlooked technique in handwriting improvement. Fixing it produces the most dramatic results of anything on this list.
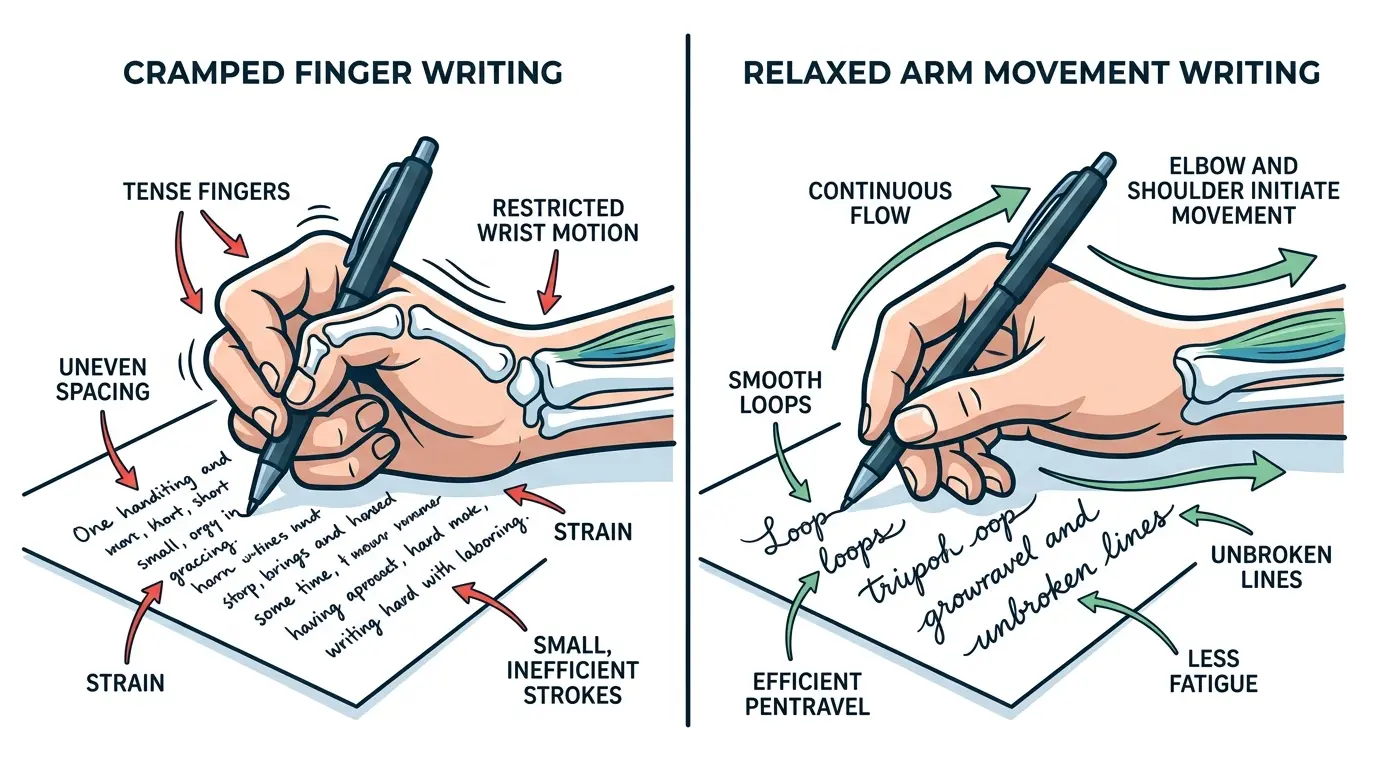
Finger writing looks like this: your hand stays mostly still, your fingers do all the work, each letter is a tiny cramped finger movement. The result is inconsistent letterforms that fatigue quickly and vary wildly in size and angle across a page.
Arm writing looks like this: your fingers hold the pen in a fixed position, and the movement comes from your elbow and shoulder gliding across the paper. The hand is a tool; the arm is the engine. Every professional calligrapher writes this way because arm muscles are far more stable and less prone to tremor than finger muscles.
Practice Drill
Rest your arm on the desk. Without touching pen to paper, draw large oval shapes in the air, moving from your elbow only. Then move to paper. Fill an entire page with connected ovals using only arm movement, fingers staying fixed. This exercise rewires muscle memory faster than any letter practice can.
Technique 3: Practice Basic Strokes Before Letters
Every letter in the alphabet is built from a small set of basic strokes. Jumping straight to letters before mastering strokes is like trying to run before you can walk. You compound problems instead of solving them.
The strokes are: upstrokes, downstrokes, ovals (clockwise and counterclockwise), arches, and loops. Upstrokes are thin diagonals moving up-right. Downstrokes are thicker diagonals moving down-left. Ovals are the foundation of a, d, g, o, q. Arches build m, n, h. Loops build l, b, f, j.
Five minutes of stroke practice daily, before any letter work, pre-loads the components of every letter simultaneously. You're building the alphabet's muscle memory from the bottom up.
Practice Drill
Fill half a page with alternating upstrokes and downstrokes in a continuous zigzag. Fill the other half with connected ovals. Do this every morning for one week before touching a letter. The consistency improvement in your actual letters will surprise you.
Technique 4: Choose the Right Pen
The pen you use directly controls how much tension your hand holds, and tension is the enemy of good handwriting.
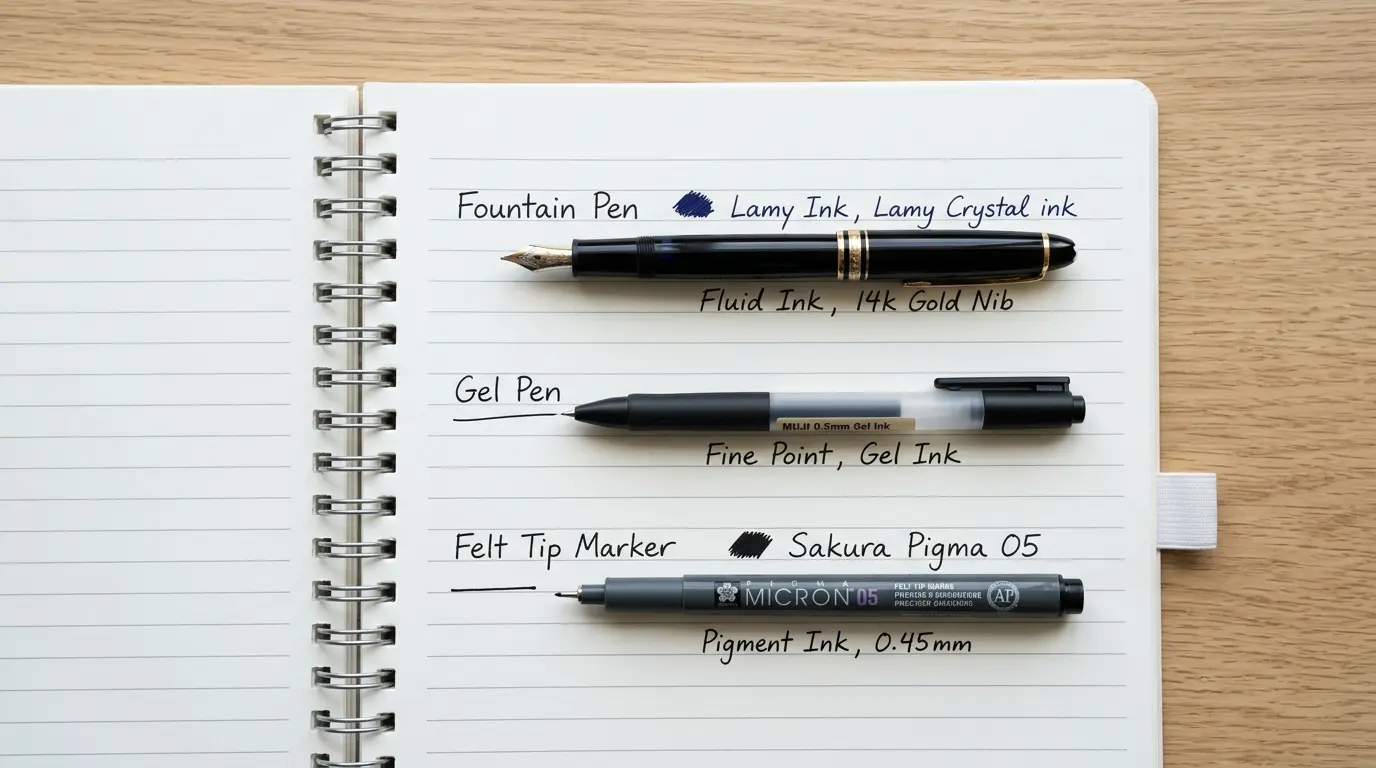
Ballpoint pens require the most pressure and produce the most hand fatigue. That pressure causes your grip to tighten, your fingers to tense, and your writing to grow smaller and more cramped over time. They are the default pen in every office and the worst choice for someone actively trying to improve.
A fountain pen glides without pressure and gives immediate feedback. It rewards a relaxed grip and punishes tension. For a more accessible entry point, a Pilot G2 gel pen is the most recommended by handwriting coaches: smooth ink flow, widely available, under $3. Felt tip pens like the Staedtler fineliner are ideal for beginners because they require almost no pressure at all.
Practice Drill
Write the same sentence with a ballpoint, then immediately with a gel pen. Notice the difference in hand tension. Commit to the gel pen for your next 30 days of practice.
Technique 5: Use Lined Paper and Guidelines
Inconsistent letter sizing is the most visible sign of poor handwriting. The fastest way to fix it is structured guidelines. Random sizing makes even well-formed letters look messy.
Every line of paper has four zones: the baseline (where letters sit), the midline (top of lowercase letters like a, e, m), the ascender line (top of tall letters like h, l, b), and the descender line (bottom of g, p, y). Consistent handwriting respects all four zones on every letter.
Start with wide-ruled paper. Once letters sit consistently on the baseline, move to college-ruled. After 4 to 6 weeks, move to blank paper. By then your muscle memory maintains the sizing automatically, without visual guides.
Practice Drill
Take any practice text and circle every letter that does not sit properly on the baseline. These are your specific target letters for the next session. Work only those letters until they hit the line consistently before moving on.
Technique 6: Copy a Style You Admire
You do not need to invent a handwriting style. Find one you admire and copy it deliberately. This is exactly how typography designers, lettering artists, and professional penmen develop their style. There is nothing unoriginal about it.
Search for handwriting fonts or penmanship styles, print a page of the one you want, and trace it first. Then copy it freehand alongside the original. Repeat until the letterforms start to feel natural in your hand.
The critical rule: pick one style and practice only that style for at least 30 days. Mixing styles is the fastest route to inconsistent handwriting. Your brain needs 30 days of repetition to encode a new motor pattern as the default. Switching mid-process resets that clock. A consistent but imperfect style always looks better than technically correct letters that do not belong to the same visual family.
Practice Drill
Print one handwriting style you genuinely want to develop. Trace 10 lines today. Copy 10 lines freehand. Repeat daily for 30 days without switching styles.

Technique 7: Daily 15-Minute Practice Routine
This is the exact practice structure that produces visible improvement in 3 to 4 weeks. Not two hours on Sunday. Just 15 minutes every single morning.
- Minutes 1–3Warm-up strokes. Fill the page with alternating upstrokes and downstrokes and connected ovals using arm movement. No letters yet. This is physical warm-up only.
- Minutes 4–8Slow copying. Open any book to a random page. Copy one paragraph at 50% of your normal speed. Full attention on consistency of size and spacing.
- Minutes 9–12Free writing. Write anything, thoughts, plans, a grocery list, without looking at a reference. This trains your muscle memory to reproduce improved letterforms automatically.
- Minutes 13–15Review and target. Photograph what you wrote. Identify your three weakest letters. Write each one 20 times deliberately, focusing on the exact stroke where it breaks down.
Results appear in 3 to 4 weeks when done consistently. The structure works because it hits warm-up, deliberate practice, automatic practice, and targeted correction, all in one 15-minute block. Consistency beats intensity every time.
How to Track Your Progress
Most people quit handwriting practice because they cannot see improvement. The reason they cannot see it is they are comparing today to yesterday. The change is too subtle at that scale.
Photograph your handwriting every Friday. Same sentence, same pen, same paper. After 30 days, compare Week 1 to Week 4. The difference will be clearly visible and significant enough to motivate you to continue.
Practice Drill
Do this right now: write the pangram sentence (“The quick brown fox jumps over the lazy dog”), photograph it, and save it as your Week 1 baseline. That single photo is the most motivating thing you can do today.
Free Tool to Practice and Visualize Your Handwriting Style
One technique that genuinely helps is visualizing your target handwriting style before spending 30 days practicing it. Before you commit, you want to know what that style actually looks like in your words, not in a generic sample sentence.
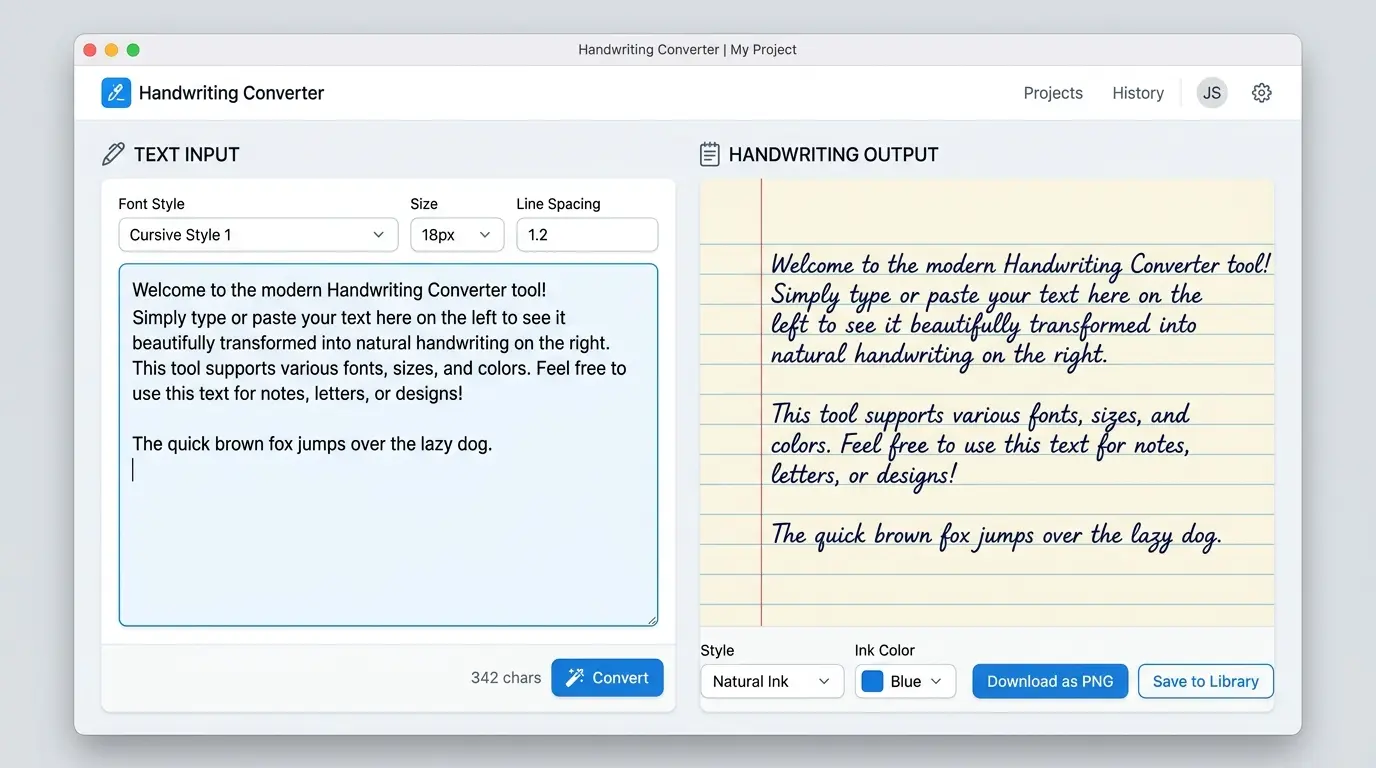
HandwritingMaker is a free text-to-handwriting converter that lets you type any text, like your name, a sentence you practice frequently, or a full paragraph, and instantly see it rendered in five different handwriting styles. You can download the result as a PNG or PDF and use it as your daily copy template.
It takes 30 seconds. Type your practice sentence, preview the five styles, pick the one that feels right, and print it as your reference sheet. No signup. No watermark. No cost.
Many users print their chosen style on a single sheet and slide it under their practice paper to trace. It is the same technique professional penmanship students use with published copybooks, except you generate your own, in your own words, instantly.
Frequently Asked Questions
Here is a quick recap: slow down deliberately, switch to arm movement, master basic strokes before letters, choose a pen that works with you, use lined guidelines for sizing, copy one style you admire for 30 days, and follow the 15-minute daily routine.
None of these require talent. All of them require consistency. The biggest mistake adults make is expecting overnight results and quitting on day 10 because the transformation is not visible yet. Improvement happens in your nervous system first, in muscle memory, before it shows up on paper. Give it 30 days.
Track your progress weekly. Be patient with the process. Every person with great handwriting was once exactly where you are right now.
Start today. Even 15 minutes. And if you want a reference sheet to practice from, generate your own free handwriting practice sheet at HandwritingMaker.com.
Ready to visualize your target handwriting style?
Type any sentence and see it rendered in 5 handwriting styles instantly. Download as PNG or PDF. Free, no signup.
Try HandwritingMaker Free